Add Third-Party Herd Data
If you do not use a VAS herd management tool, you can still access Alta Blue Link to gain valuable animal insights and use advanced genetic planning tools to make informed decisions that guide your herd toward its genetic goals:
- If your herd has been migrated from Alta Blue Link, your data has already been imported into the genetic planning tool and you can proceed to Create a Genetic Plan.
- If your herd is brand new, contact your Alta Blue Link admin to create a third-party herd and follow the steps below to import herd data so you can use it to start building genetic plans:
Follow the steps below to import multiple animals from your third-party herd management system:
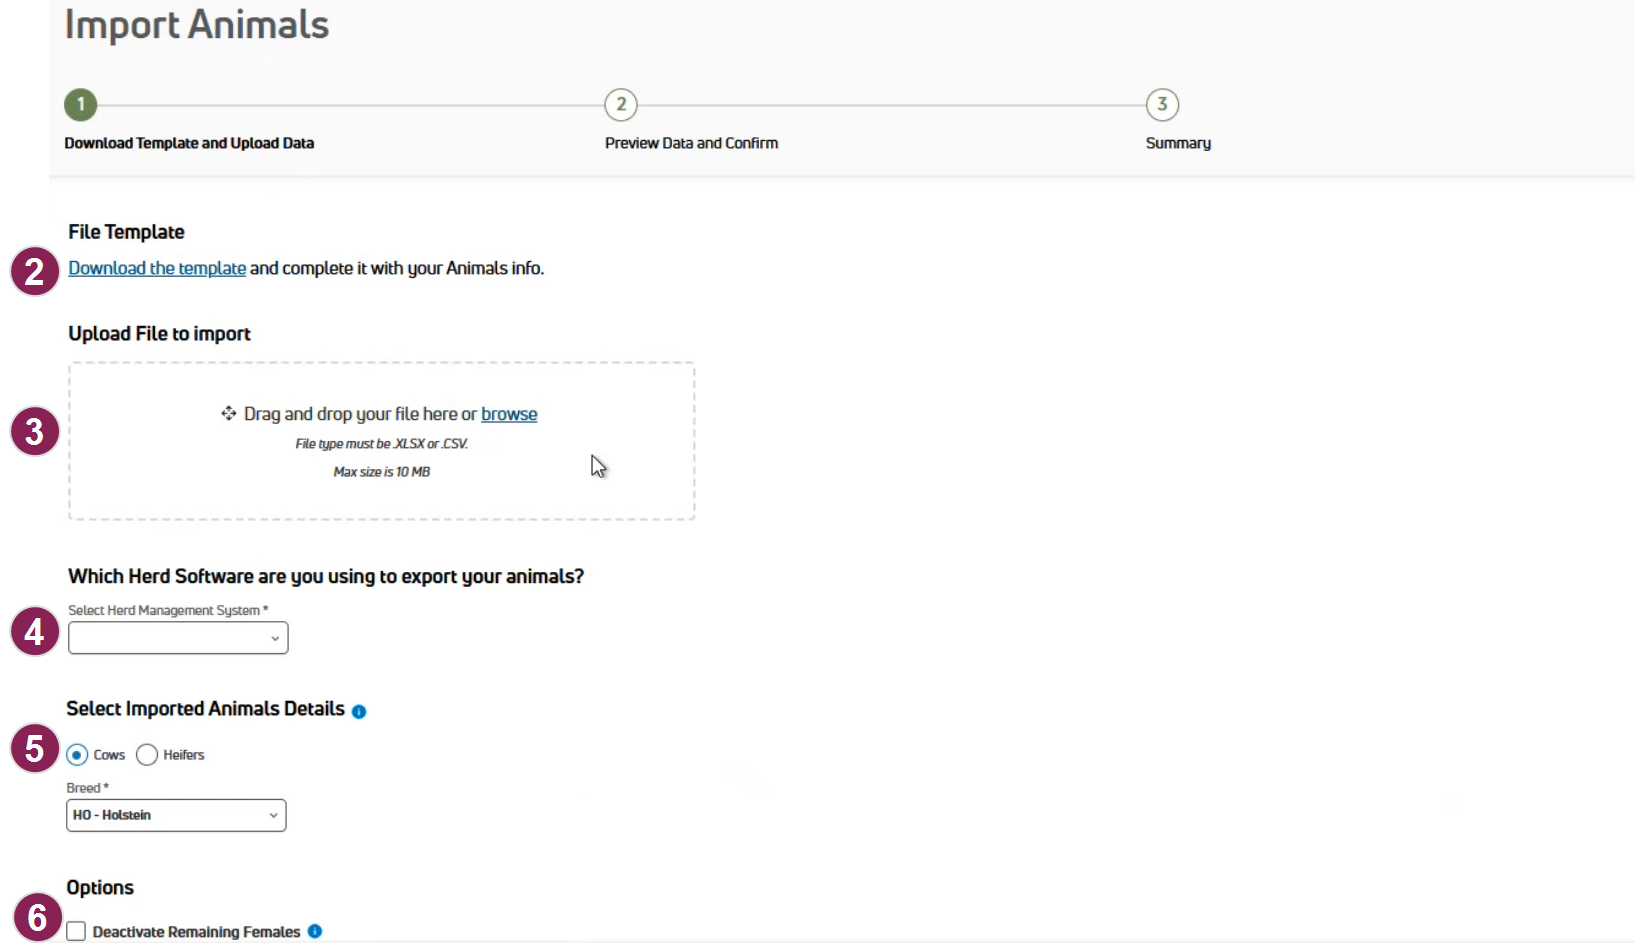
- From the main menu bar, select Alta Blue Link > Animals > Import Animals.
- Click Download the template. In the downloaded template, enter your herd data and save it. Follow the guidelines to ensure that your animals can be imported successfully:
- Enter as much animal information as you can. Alta Blue Link yields more accurate results when you add more information. Animal ID
 Identifier is required to proceed, but all other fields are essential for creating a quality genetic plan:
- Animal ID
- Barn Name
- Registration Number
- Lactation Number
- Birth Date
- Fresh Date
- Sire ID
- Maternal Grandsire ID
- Maternal Great-Grandsire ID
- Heifer or Cow
- If you do not provide enough animal information, Alta Blue Link can estimate or enter some information using proofs or other telling data points. For example, if an animal only has a Heifer designation, the genetic planning tool can infer and denote that its lactation number is 0.
- Any phenotype value (physical trait) must be a whole number between 1 and 10. If you want to use linear mating, you must enter phenotype data.
- Click browse and select the completed template.
- Select the Date Format that you use.
- Select the Herd Software that you use.
- Select whether the imported animals are Cows or Heifers and the animal Breed.
- Check the box next to Deactivate Remaining Females to deactivate all females that are not included in the imported file.
- Click Continue to view a list of the animals included in the file. Use Filters in the upper left corner to search for an animal by animal ID or to narrow the list by Animal State, which indicates whether an animal can be imported or not:
- Validated Animals: All the animal information is valid and the animal can be imported.
- Animals with Warnings: Some animal information is missing or incomplete, but the animal can still be imported.
- Animals with Errors: Some animal information is not valid and the animal cannot be imported until the errors are fixed.
- Click Import to add the animals and review your summary. If any animals were not imported, click Download list of animals that were not included to review a list of incorrect or missing animal data:
- Red: Invalid or missing required data is listed in red. This information must be fixed before you can import an animal.
- Orange: Missing data is listed in orange. This information will improve the Alta Blue Link's performance, but it is not required to import an animal.
After you successfully import your animals, you can start building your genetic plan.
Follow the steps below to add a single animal from your third-party herd management system:
- Select Alta Blue Link > Animals > Add Animal from the main menu bar.
- Select whether the animal is a Cow or a Heifer.
- Enter the animal's ID and breed. Enter as much animal information as you can. Alta Blue Link yields more accurate results when you add more information. Animal ID is required to proceed, but all other fields are essential for creating a quality genetic plan.
- Enter the animal's phenotype data (physical traits). Each value must be a whole number between 1 and 10.
- Review the animal's summary, then click Add save your changes.
To view your imported animals, select Alta Blue Link > Animals > Animal List from the main menu bar. Use the following guidelines when using the Animal List:
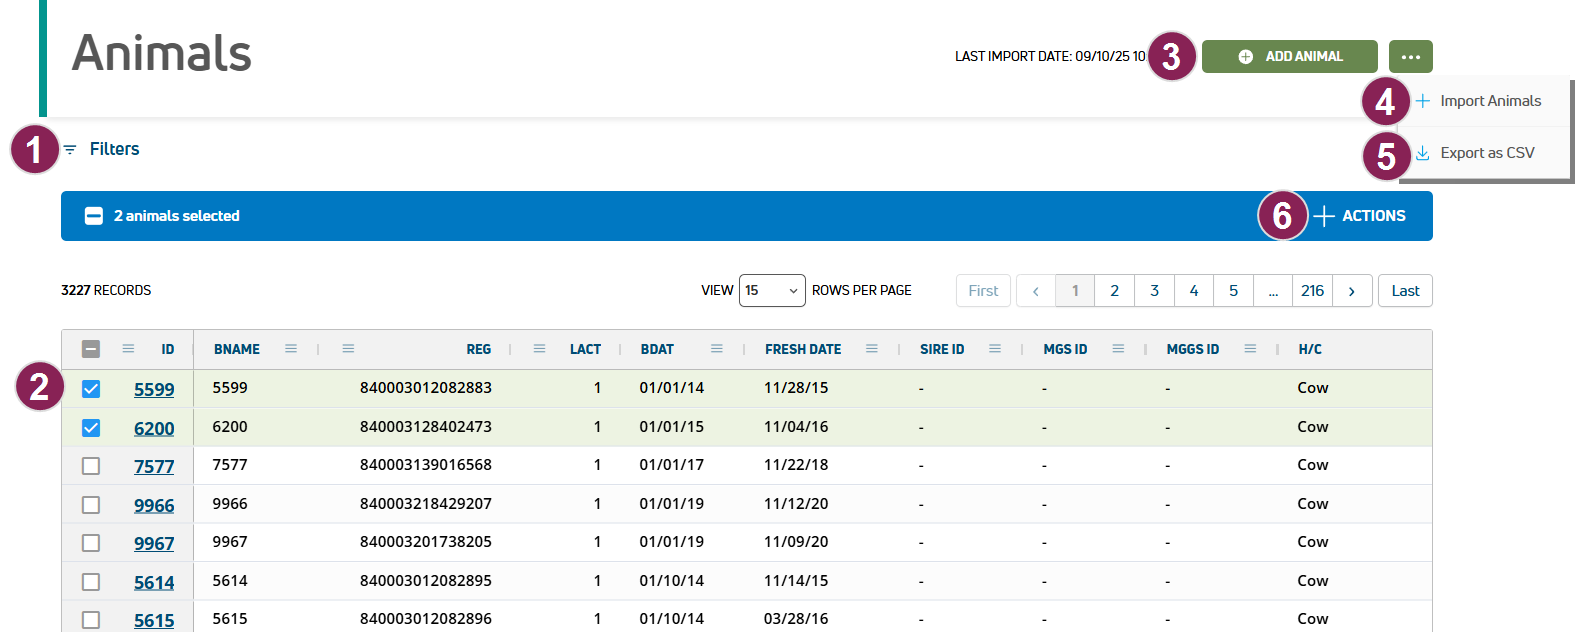
- Use the Filters in the top left corner to search for animal by its animal ID or to limit the list to only Active or Inactive Animals.
- Click on an animal ID to view or edit its details in a side panel.
- To add a single animal, click Add Animal in the top right corner.
- To add multiple animals at once, click the Options button
 in the upper right corner, then click Import Animals.
 - To export your animal data, click the Options button in the upper right corner, then click Export as CSV.
- You can mark multiple animals as Active or Inactive, or delete multiple animals at once. Check the boxes next to the animals you want to edit and click Actions in the upper right corner to make your changes.
After you successfully import your animals, you can view some of your imported data in the listed Alta BLUE LINK Genetic Dashboard widgets.
Click Alta Blue Link > Overview from the main menu bar to access the dashboard:
- Herd Assessment: Use this widget to review animal counts, including the number of cows, heifers, and total animals, as well as breed. See Herd Assessment to learn more.
- Genetic Averages by Company: Use this widget to compare genetic averages by company. This widget only shows data if your imported animal data includes sire data. See Genetic Averages by Company to learn more.
- Herd Genetic Overview: Use this widget to assess 12 key genetic traits for the herd. This widget shows groups of heifers and cows, but pregnancies are not recorded for imported animals. See Herd Genetic Overview to learn more.
- Heifer Inventory: Use this widget to view all live heifers grouped by birth year and reproduction status. This widget only shows data if your imported data includes birth dates. See Heifer Inventory to learn more.
To export your animal data, select Alta Blue Link > Animals > Animal List from the main menu bar. Click the Options button ![]() in the upper right corner, then click Export as CSV.
in the upper right corner, then click Export as CSV.
Last Built: November 11, 2025